Pragmage è in grado di realizzare ricostruzioni tridimensionali di elementi presenti nella realtà, come oggetti comuni o opere d’arte. Basandosi sulla tecnica del multi-view stereo matching, quindi sull’acquisizione del modello 3D direttamente dalla realtà, le ricostruzioni che vengono realizzate sono molto fedeli alla realtà, sia nelle forme che nei colori.
Come funziona la ricostruzione?
L’elemento che si vuole ricostruire in 3D viene fotografato in ogni sua parte, seguendo dei criteri fondamentali per una corretta acquisizione del modello. Una volta selezionate in modo accurato, le fotografie vengono elaborate tramite una serie di processi utili a modellare, pulire e ottimizzare il modello.
Un esempio: il Monumento al Marinaio
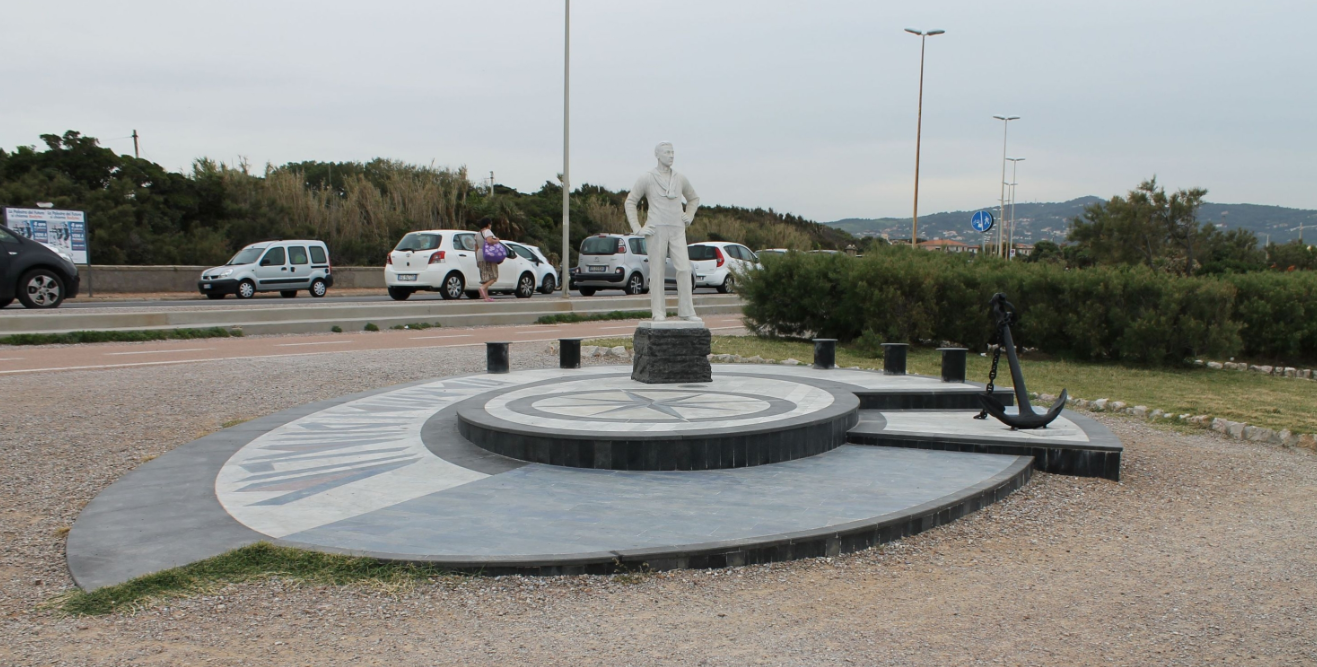
Il Monumento al Marinaio è un’opera d’arte situata sul lungomare di Livorno, vicino all’Accademia Navale. Inaugurata il 18 novembre 2013 alla presenza del personale della Marina, delle autorità locali e di alcuni cittadini, è stata sostenuta dall’Associazione Nazionale Marinai d’Italia, il gruppo di Livorno “Alfredo Cappellini” e la sua attuazione è stata garantita dalle numerose donazioni effettuate da vecchi marinai e da alcune delle più importanti realtà marittime della città.
“È uno specchio, questo mare. Qui, nel suo ventre, ho visto me stesso. Ho visto davvero.”
Oceano Mare, Alessandro Baricco
Il monumento rappresenta lo stretto rapporto tra i marinai della Marina morti nel mare e tutti i civili marittimi che garantivano il benessere della città con il loro lavoro.
L’opera è composta da diversi elementi combinati tra loro: la statua di un marinaio, una base che rimanda a una barca, un’ancora e sei bitte.

Il modello 3D
Acquisition and 3D modeling process
Acquisition
Step 1 – lots of photos and even more of patience
The 3D model of the monument to the sailor of Livorno has been realized starting from some photos of the artwork taken on the field. The used camera is a Canon EOS 1100D equipped with a Canon Zoom Lens EF-S 18-55mm. The photos has been taken turning around the monument: at first at a distance, to include all the structure, then individually, for each single element, finally for each detail. The weather condition is very importnat to achieve good results: each dataset has been realized under cloudy condition in order to minimize shadows and glares.
Problems and mistakes
The weather, the size of the monument, the large flat surfaces and the lack of contrasts in many areas of the base are the factors that have contributed most to make the acquisition of the 3D model really difficult.
Four different photo session has been made to get a good set of photo to use for the acquisition of the 3D model: during the first one, the weather was very variable and did not allow me to take enough photos; with the second one, I managed to get the model of the Sailor statue, but I could not use it for the rest of the monument, because of the weather and partly due to my lack of experience in the selection of the shots; the third set has been used to realize the base of the monument; beacause of the lack of contrast on some surfaces of the monument’s base, for safety I also made a fourth photographic set, where I put some markers to facilitate the capture of all the photo’s features. However, the third set returned good results, the process of elimination of the markers from the cloud of points (and consequently the process to obtain the right color in areas where they were present) would have required more time. Furthermore, the weather wasn’t kindly again, so I did not use this last set of data.
Step 2 – Which photos?
Before to use Visual SFM the unusable photos has been discarded, for example blurred photos, not so “steady” photos or photos in backlight. Given that for precaution, in the shooting phases, a very huge number of photos had been taken, from the remaining photos, just some has been selected for usage, for each point of view the best photos has been selected.
Visual SFM
Step 1 – compute missing matches
After the photos has been choosed, they were loaded in Visual SFM: In total 46 photos has been used for the stuate and 121 for the base. After loading the photos the “Compute missing matches” procedure has been launched in order to extrapolate the images’ features.
Step 2 – compute 3D reconstruction
When the images’ features has been extrapolated the “Compute 3D reconstruction” procedure has been launched. This procedure compares the features of each photo in order to calculate the “overlapping” between each image and extrapolates foundamental informations such as calibration, orientation and position in space. After that, Visual SFM provides a preview of all the found common points (that makes the point cloud) and of the position of the camera in the space (relative to each photo).
Step 3 – dense reconstruction
Finally, once I known the intrinsic and extrinsic parameters of each photo , I started the “dense reconstruction” : this tool seeks new points in common between photos (close together) and provides a point cloud much denser than the last one. The dense reconstruction has provided a single cloud of points for the Sailor statue, while it has created 3 clouds for the base. This multiplicity of clouds may be due to a poor contrast, especially in some areas of the monument: for example, between the lowest floor, the edge of the step and the upper surface there is no color difference (they are all colored in a dark gray); therefore , in this cases it is very complex to find points in common, both for a person , but even more for a machine.
Meshlab & Blender
Step 1 – spring cleaning
All point clouds obtained required a great cleaning. Therefore, Meshlab has been used to delete all the points that had nothing to do with the monument because they belonged to other elements of the environment, or because they really didn’t exist and they have been erroneously created in Visual SFM. The cleaning of the clouds took a long time and a lot of precision. The biggest problems were found in the flat surfaces of the base: the dense riconstruction made in Visual SFM had produced a lumpy pavement, with unaligned points. So it was really difficult to understand which points should be eliminated. However, even if the statue is smaller than the base, it has taken a long time to clean, but did not report major problems.
Problems and mistakes
Lots of problems have been encountered in that process. Firs of all, the statue’s lumpy back and its head, which was very difficult to acquire, both for its height (it was hard to take the photos), that for its color with no great contrasts, which sometimes camouflaged with the surrounding environment (like the cloudy sky in photographs from the bottom or the ground around the base in the photos from above).
Some other problems were encountered in the acquisition of bollards and the anchor, all completely blacks and reflective. Therefore I decided to remove the points representing these elements, because it was quite impossible to acquire them.
Step 2 – the great Poisson
At this point the surface reconstruction procedure has been strted by using the “Poisson” filter. As for the base, since three different clouds of points had been obtained, prior to re-create the surface all the models had been joined in a unique cloud. “The great Poisson gives, the great Poisson takes”. Once obtained a mesh, since the Poisson algorithm does not brings with it the colors, this information has to be transfered in some way. Colors have been transfered to the obtained mesh “for vertices” (Filters -> Sampling – > Vertex Vertex Attribute Transfer ) taking as source the original point cloud. Furthermore, since by definition Poisson provides a closed mesh, it has been necessary to make a new cleaning of the model removing the unnecessary recreated surfaces.
Step 3 – smoothing and flattening
I used the MeshLab “smooth” tool to make all the grainy surfaces more smooth. Then, to make the base surfaces flat, It has been adopted a strategy that involves the use of both MeshLab and Blender softwares:
1. I have divided the stand in 5 mesh (the lower level, the lower inclined plane, the median plane where there is the anchor, the upper floor and the side vertical surfaces);
2. one at a time, I imported each of these mesh (except the one of the side of the step) in Blender and I applied the “Make Faces Planar” plugin on it to makes every surfaces flat;
3. I repositioned all meshes and I merged them into a single mesh. So, with a mesh for the statue and one for the base, I imported the Sailor statue in the same project.
Problems and mistakes
Lots of problems have been encountered in that process. Firs of all, the statue’s lumpy back and its head, which was very difficult to acquire, both for its height (it was hard to take the photos), that for its color with no great contrasts, which sometimes camouflaged with the surrounding environment (like the cloudy sky in photographs from the bottom or the ground around the base in the photos from above). Some other problems were encountered in the acquisition of bollards and the anchor, all completely blacks and reflective. Therefore I decided to remove the points representing these elements, because it was quite impossible to acquire them.
Step 1 – spring cleaning
All point clouds obtained required a great cleaning. Therefore, Meshlab has been used to delete all the points that had nothing to do with the monument because they belonged to other elements of the environment, or because they really didn’t exist and they have been erroneously created in Visual SFM. The cleaning of the clouds took a long time and a lot of precision. The biggest problems were found in the flat surfaces of the base: the dense riconstruction made in Visual SFM had produced a lumpy pavement, with unaligned points. So it was really difficult to understand which points should be eliminated. However, even if the statue is smaller than the base, it has taken a long time to clean, but did not report major problems.
Meshlab & Blender
Step 2 – the great Poisson
At this point the surface reconstruction procedure has been started by using the “Poisson” filter. As for the base, since three different clouds of points had been obtained, prior to re-create the surface all the models had been joined in a unique cloud. “The great Poisson gives, the great Poisson takes”. Once obtained a mesh, since the Poisson algorithm does not brings with it the colors, this information has to be transfered in some way. Colors have been transfered to the obtained mesh “for vertices” (Filters -> Sampling – > Vertex VertexAttribute Transfer ) taking as source the original point cloud. Furthermore, since by definition Poisson provides a closed mesh, it has been necessary to make a new cleaning of the model removing the
unnecessary recreated surfaces.
Step 4 – is there something missing?
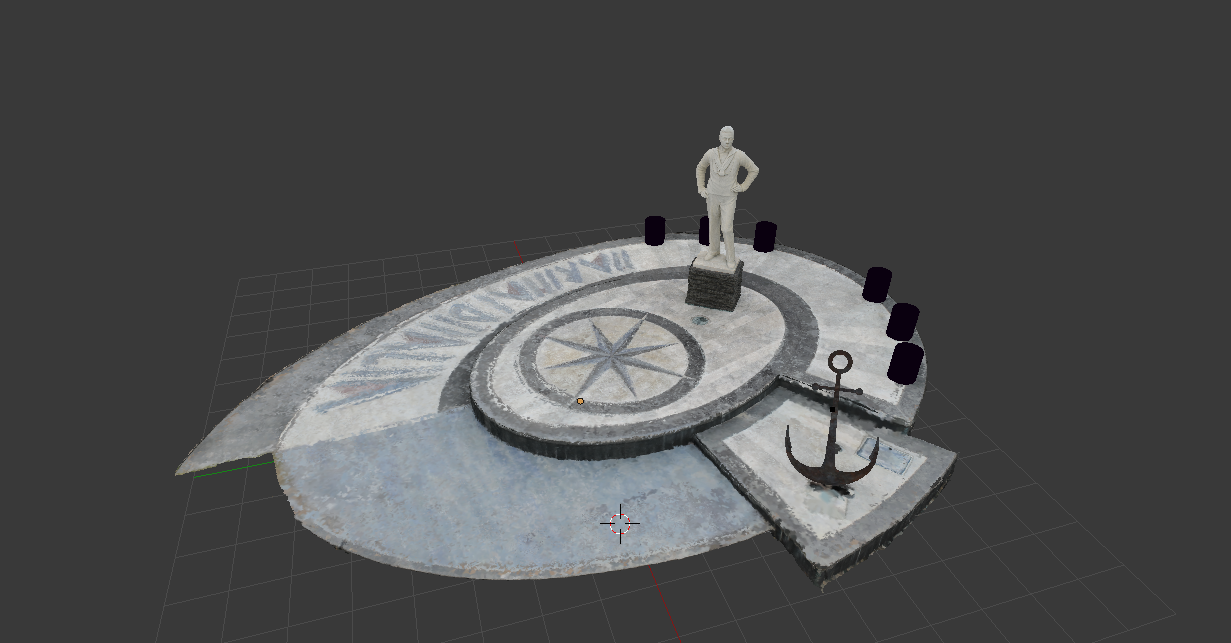
Again in Blender, 6 cylinders has been created and placed in the same places where the bollards that I had to delete were. In addition, the 3D model of an anchor had been added so as to give the viewer the idea of what are the elements that make up the monument.
Finally all the meshes were combained (join) and the model had been exported in the “.ply” format. Both additions were earlier textured in MeshLab.
Step 5 – the end
Finally, I scaled and positioned the 3D model along the axes.